Use these steps to trace contours on the baseline (axial, sagittal, and coronal) views, to outline and mark the region of interest on the slices that intersect the region.
Step-by-step instructions
Open the MR General Review.
Select the desired baseline view (axial, sagittal, or coronal) from which you want to start painting.
From the Segmentation Toolbar, click the Paint on Slices icon (). to view the Paint on slices screen.
Figure 1. Paint on slices screen
Move the 3D cursor location to the feature of interest and, if necessary, adjust window width and level on the view so that the feature of interest is clearly distinguishable.
Click the Edge attraction option to refine the drawn contours and adjust them to the nearby structures.
This automatic feature may speed up the contour process.
To use the edge attraction function, first adjust window W/L so that the edge of the feature of interest is clearly visible on the view. You can now move the mouse cursor slightly ahead of the trace, and drag it around the edge of the feature of interest: the software keeps the contour on track along the border between different pixel densities even if you do not follow it precisely with the cursor.
Without edge attraction, the trace simply follows the mouse cursor.
From the Paint on slices screen, click the Add Paint icon ().
Move the mouse pointer onto the edge of the feature of interest, then press and hold the Shift key and click and drag the cursor to define the area. Release the mouse button to close the contour, thus connecting the first to the last point.
Note: You can click Undo to undo your last action.
Move to the next slice on which you want to paint.
You do not need to paint every slice.
All contours must be defined in the same view types (e.g., axial view).
Whenever painted contours on two slices overlap (i.e., lie at least partly on a common or perpendicular axis) the software automatically performs an interpolation and applies paint to the intervening slices.
To avoid creating unwanted paint traces, do not use the Shift key to move the 3D cursor at this stage.
Trace the contour continuing in the same manner until the entire feature of interest is painted.
Verify that the feature of interest is correctly painted on all slices by scrolling through the slices that contains the feature. In particular, check the interpolated slices.
If small parts of a feature have remained unpainted, you can simply contour and paint the unpainted area.
If paint has spilled outside the feature of interest, you can remove it from part of a slice.
To remove paint from part of a slice, follow these steps.
Click the Corrects Contours icon ().
Simultaneously press Shift and trace the contour of the area you want to clear. Release Shift and the contour is removed.
If you use the Corrects Contour mode on different slices, the software will interpolate and clear the intervening slices in the same manner as it interpolates and applies paint in the paint mode. For this reason, use the function with care: you may at times find yourself unintentionally clearing more of the paint than you intended.
To remove contours, click the desired Clear Contours option:
Last to remove the last defined contour.
Slice to remove the contour on the current slice.
All to remove all defined contours.
Click Apply to segment the 3D volume by removing all parts that are not painted.
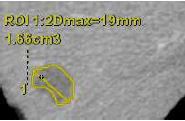
To generate an ROI from the contour, click Convert to ROI.
The Max Diameter and Short axis are automatically calculated from the defined volume. ROIs created from Paint on Slices cannot be unlocked for further modification. From the right mouse menu, delete the ROI and restart Paint on Slices. Figure 2. Paint on slice contour converted to an ROI
To keep all pixels with the selected intensity, place the cursor over pixels that represent the pixel intensities you want to keep and click Keep Object. All other pixels are discarded.


 ). to view the Paint on slices screen.
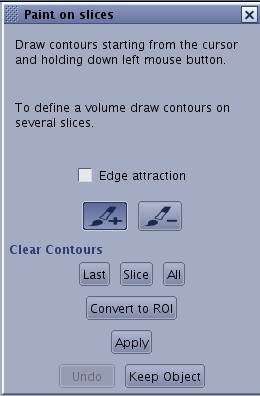
 ).
). ).
).