• Object ID: 00000018WIA30EE7970GYZ
  • Topic ID: id_40022185 Version: 1.3
  • Date: Mar 30, 2022 9:47:50 AM

Auto Select

About this task

Use these steps to select an object in a 3D volume and then modify the destination view (upper left viewport) by adding or removing objects or vessels. This feature allows you to create more complex VR views with multiple object segmentations and visualizations.

Step-by-step instructions

  1. Open the MR General Review.
  2. Select the desired baseline view (axial, sagittal or coronal).
  3. From the Segmentation Toolbar, click the Auto Select icon ( ) to view the Auto Select screen.
    Figure 1. Auto Select screen
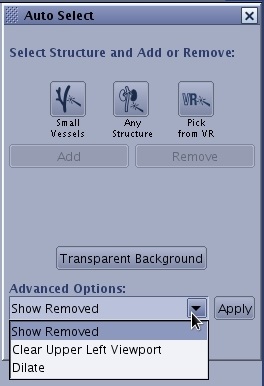
  4. From the Auto Select screen, select the type of structure to modify.
    • Click to segment small blood vessels with a diameter below 5 mm with a single click.
    • Click to segment soft tissues from a seed point that have a diameter above 5 mm .
    • Click to segment an object from a VR image.

  5. Respond to the prompt to clear the viewport.
  6. Add is automatically selected. Click Add or Remove to determine the cursor action. Typically, add a vessel/structure first. Place the cursor over the vessel/structure of interest and press and hold the cursor on a 2D viewport until the object is filled.
    • The object appears on the previously cleared viewport.
    • Repeat this step to add more structures.
    • As you add or remove objects, traces will display in the planar views outlining the data that has been manipulated in the destination view. To validate that the area of interest is included scroll through the data set on an axial or reformatted view.
    • The following choices are available from the Advanced Options drop–down menu:
      • Clear Upper Left Viewport deletes the image in the primary view.
      • Show Removed displays the removed parts. This then becomes the current view and it is the earlier feature of interest that is removed from view.
      • Dilate adds layers of voxels to the surface of the current object.
    • You can undo up to eight processing steps by clicking the Undo button from the Auto Select screen.
  7. To merge views (add the segmented view to another view), follow these steps.
    1. Click Transparent Background to set the background to transparent and thus display the structures on a transparent VR of the whole volume.
    2. From the Multi-Objects screen, click the Hide/Show icon to hide or show the background structure.
      Figure 2. Hide/Show icon
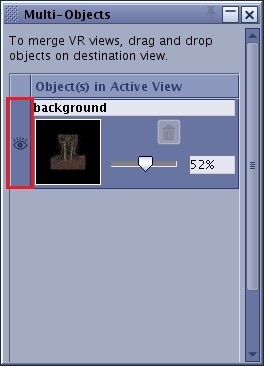
    3. If desired, to label the structure, highlight the name in the text field and type a new label.
    4. Click the slider to change the percentage of transparency for the background or structure.
  8. Click and drag the VR image to the top left viewport and drop it into the area marked as "Drop here to mix the views".