Acquire a scan with a Filter or Intensity Correction
About this task
Use these steps to add an Intensity Correction (SCENIC or PURE) or an Intensity Filter from the Scan Parameters screen in a scan session. Note that Intensity Correction filters can only be added to the scan prescription. Intensity Filters can be added post reconstruction from ClariView.
CAUTION
Images filtered for uniformity with SCENIC may contain hyper- or hypo-intense signal areas that are not apparent on unfiltered images. SCENIC filtering is derived from the image itself, and the results can therefore be affected by tissue shape and contrast.
CAUTION
Images filtered for uniformity with PURE may contain residual signal variation arising from sources other than tissue contrast. Such variation can be more apparent in PURE filtered images than in unfiltered images, because default window width values display more contrast after PURE. Please refer to Filter considerations for more detail.
Step-by-step instructions
To add an Intensity Filter or Intensity Correction to a scan series, follow these steps.
From the Workflow Manager, select the series to which you want add an intensity filter or intensity correction.
Click Setup.
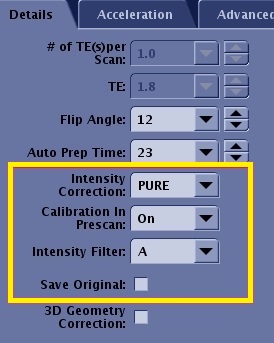
To view the Details screen, click the of the scan parameter screen.
Figure 1. Example of Details tab filter selections area
Complete one or more of the following:
Click the Intensity Correction menu and select NONE, PURE or SCENIC.
If any or all of these scan parameters are selected (ASSET, HyperBand, PURE), and if you select On from the Calibration in Prescan menu, which is located on the Details tab, a calibration scan is acquired during Auto Prescan.
Select PURE for musculoskeletal and (multi-phase contrast enhanced) acquisitions.
Select SCENIC for pelvis acquisitions.
reFINE (PURE) and SCENIC can only be applied to images acquired with compatible coils.
Click the Intensity Filter menu and select one of the filters. A custom filter has a U prefix. Figure 2. Intensity Filter menu
Click Save Original to create an additional image series for unfiltered or uncorrected data. Note that the Intensity Correction filters cannot be generated post reconstruction, that is they do not appear on the ClairView screen.
Click the Advanced tab if an Intensity Correction filter is selected.
If you have selected reFINE (PURE) as an Intensity Correction filter, select PURE compensation.
Complete all scan and graphic parameters.
Click Save Rx and Scan.
reFINE (PURE) and SCENIC can be saved as part of a series protocol.
To add an Intensity Filter as a post-process task in scan procedure, follow these steps.
From the Workflow Manager, select the series to which you want add a filter or intensity correction.
Click Setup.
Result
The series state changes to InRx.
Click Add Task > Add Post Processing.
From the Add Post Processing Task screen, select Image Enhancement Filters.
Click Setup.
From the Setup Post Process Task screen, make the post-processing task automatic or manual.
Click Accept.
If you select Automatic, you must select an Intensity Filter from the Image Enhancement Filters menu.
Note: The original, un-enhanced filtered series appears in the Source Series Data list if Save Original option is selected from the Details tab.
If you select Manual, no filter selections are available at this time. You will make your filter selections after the images are acquired.
To run a manual filter task in the Workflow Manager, follow these steps.
From the Workflow Manager, select the RxD post process Filter task.
Click Run to open the post process application.
Complete the post process task.
Click Done to exit from the post process application to restore the full Workflow Manager screen.


 of the scan parameter screen.