Use these steps to assign roles for each MR system users. Only administrative users can access the User Accounts configuration.
Step-by-step instructions
In the header area of the screen, click the Tools icon .
From the System Management work area, click the Service Desktop Manager tab.
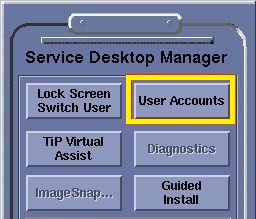
From the Service Desktop Manager, click User Accounts.
Figure 1. Service Desktop Manager screen
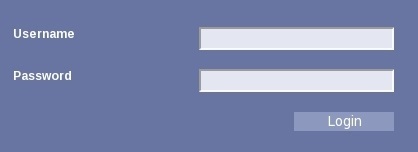
Type the administrative user name and password.
Figure 2. User accounts screen
Click Login.
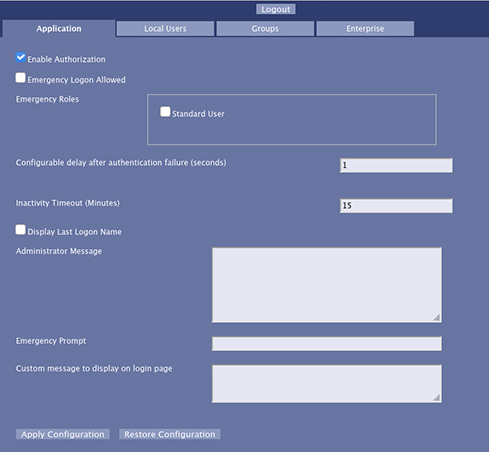
When you log in as an administrator, the User Accounts interface opens to the Application tab.
System administrators can do a number of tasks that affect what users can do or will see when they log into the system.
From the Application tab, follow these steps.
Figure 3. Application tab
Enable Authorization: Confirm that it is turned on (default).
When authorization is enabled, anyone logging in through EA3 (both local and enterprise users) must have a role. Anyone without a role is denied access. This means that everyone in your department must have a password to log onto the MR system.
Emergency Logon Allowed: Either enable or disable (default, recommended) this option.
Enable Emergency Logon Allowed if you want to grant system access to an MR tech who does not have a password.
Disable Emergency Logon Allowed to prevent emergency user access.
Emergency Roles: These are the roles that are assigned to the emergency user, which is a Standard user role.
Configure delay after authentication failure: This setting defines a delay time, in seconds, that a user is prevented from logging onto the system after an authentication failure. The value must be a number of 1 or greater. The recommended value is 3-5 seconds.
Inactivity Timeout (Minutes): The minutes that must elapse without any mouse/keyboard, etc. activity before a timeout is generated. When a timeout is generated, the EA3 logon screen is displayed. This value can be any positive integer, or it can be 0. If the value is 0, this indicates NO inactivity timeout; regardless of how much time has elapsed the system does not timeout.
Display Last Logon Name: When this setting is enabled, each time the splash logon screen is displayed, it displays the user ID of the last user that has logged in. As an administrator, you can see who had the last access to the system.
Administrator Message: Under certain circumstances/error conditions, the user of EA3 is asked to contact an administrator. This field allows the administrator to specify their contact details and a custom message.
Emergency Prompt: The text that is displayed to any user logging in as emergency. The user is asked to enter information (usually their actual user name). This text appears in that prompt for information.
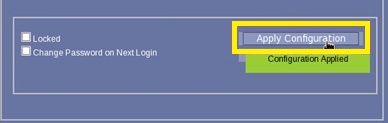
Click Apply Configuration to accept your configuration changes.
If there was a problem with making the changes (such as an invalid value or a problem contacting the back end Servlet) an error message box appears with a description of the error.
If the changes are successful, then a brief message appears indicating that the changes were applied in a green label.
Click Restore Configuration to undo any changes made that have not yet been saved.
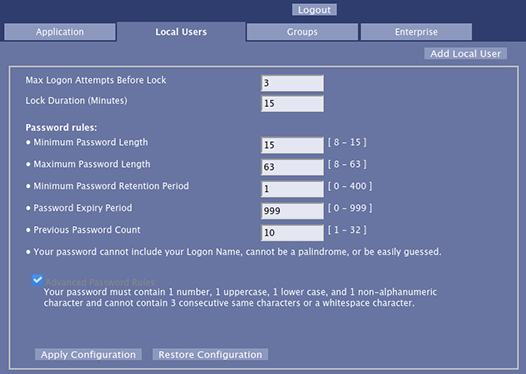
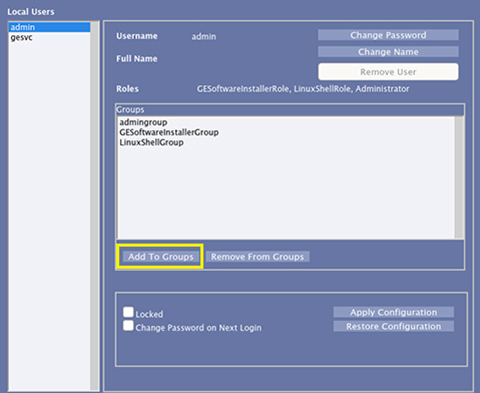
From the EA3 Administration screen, click the Local Users tab.
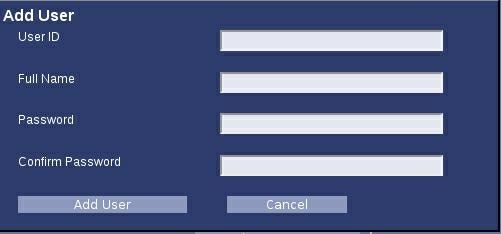
From the Local User tab, click Add Local User.
Figure 4. Local User tab
From the Add User screen, type information for each of the following and then click Add User:
A unique User ID
Full Name
Password
Confirm Password
For password guidelines, see Password. Figure 5. Add User screen
Click Add To Groups.
Figure 6. Groups area of Local User tab
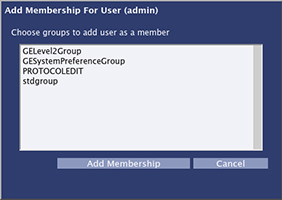
From the Add Membership for User screen, select the desired group and click Add Membership.
Press Shift and click each desired role if you want more than a single role assigned to the user. Figure 7. Add Membership for User screen
At the bottom of the screen, click Apply Configuration and close the screen.


 .
.