

- 00000018WIA30D6E870GYZ
- id_400229171.3
- Dec 23, 2021 2:56:28 PM
Set up a Ready Brain scan
About this task
Step-by-step instructions
- From the Workflow Manager, select the Ready Brain 3D Localizer and click Setup.
- The Ready Brain reference line can be set from the Exam Preference screen before saving the first task or the System Preference screen before starting an exam.
Figure 1. The ACPC line extends from the superior surface of the anterior commissure to the center of the posterior commissure 
Figure 2. The Orbitomeatal line extends from the nasal root through the pontomedullary junction 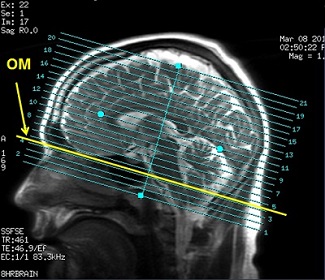
- The Ready Brain 3D Localizer calculates the brain center in all 3-dimensions basing the center on the ACPC or the OM line.
- It is critical that you adjust the Slices per Slab or Slice Thickness to cover the entire brain.
Figure 3. Example of a Ready Brain 3D localizer 
- The Ready Brain reference line can be set from the Exam Preference screen before saving the first task or the System Preference screen before starting an exam.
- Once the Ready Brain post process task is completed and in the Done state, all the remaining tasks in the Workflow Manager are in the RxD state.
Figure 4. Ready Brain 3D Loc SSFSE showing associated Ready Brain post process task 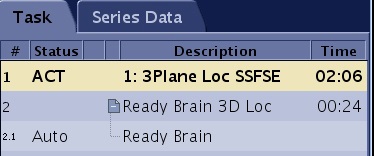
- It may take the system some time to calculate the three dimensions. A calculation message displays with a progress bar indicating that the system is propagating the geometry information.
Figure 5. Ready brain geometry calculation progress bar 
- It may take the system some time to calculate the three dimensions. A calculation message displays with a progress bar indicating that the system is propagating the geometry information.