• Object ID: 00000018WIA30811870GYZ
  • Topic ID: id_40023651 Version: 1.8
  • Date: Jul 24, 2022 7:25:07 PM

Position the patient

Before you begin

Thoroughly review Prepare the patient and Screen patients and personnel prior to scanning a patient or allowing anyone into the MR scan room.

Step-by-step instructions

  1. Position the patient on the table, either head or feet first.
    • Typically, use head or feet first for body scans and head first for head and neck.
    • For table weight specification details, see Technical specifications.
    • All MR healthcare providers that work with the patient must be trained to reduce the risk of patient muskuloskeletal injury such as fracture, dislocation or subluxation during the transfer of the patient on/off the table, positioning the patient on the table, positioning coils on the patient, etc.
  2. Position the patient either supine, prone, left decubitus, or right decubitus.
    • From the Scan control panel, match the patient's position and orientation with the selection made on the Patient Orientation button. Click the arrows to change the patient orientation icon.
    • Ensure that the patient forms no closed body loops. For details, see step 4.
    Table 1. Patient Orientation menu
    SelectionDescription
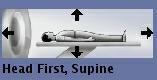
    Head first, supine orientation.
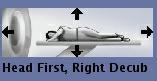
    Head first, right decubitus orientation.
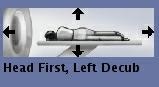
    Head first, left decubitus orientation.
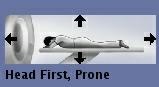
    Head first, prone orientation.
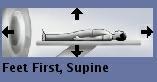
    Feet first, supine orientation.
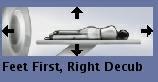
    Feet first, right decubitus orientation.
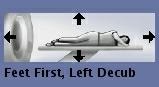
    Feet first, left decubitus orientation.
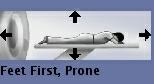
    Feet first, prone orientation.
  3. Position the imaging coil, if needed.
    • Each coil, other than the body coil, has an operator manual. Refer to the coil operator manual when setting up the patient for an exam.
    • Use the supplied coil pads with the coil at all times. The coil should never come into contact with the patient.
    • Never let the coil’s RF cables come into contact with the patient. Position cables under a cushion whenever possible.
    • Use only approved, undamaged RF coils.
    • Inspect coils for damage and wear. Do not use a coil that is not functioning properly, e.g., tuning problems or intermittent poor quality images.
    • When using the Head Neck Array coil, it is recommended to first place the base of the coil on the table then position the coil on the patient. Storing the coil on the table or the bore entry is not advised.
  4. Position the patient with padding.
    • Review Contact point heating for patient positioning information.
    • Position the patient so that there is no direct contact between the patient's skin and the bore of the magnet or an RF coil.
    • Hand-to-hand, calf-to-calf, and elbow to side contact should be avoided. To help prevent a patient burn from closed loops formed by clasped hands, hands touching the body, from thighs touching, or from the patient’s breasts contacting the chest wall over a small area, insert nonconducting pads at least 0.25 inches thick between touching parts.
      Figure 1. Patient positioned with non-conducting pads
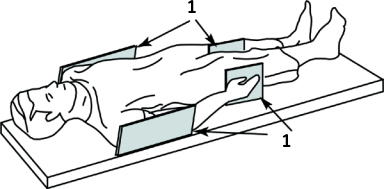
    • For more patient padding details, see Patient padding.
  5. Position the patient with straps. Insert the straps into the mounting track on the table and wrap the straps around the patient. Straps are to stabilize, not restrain the patient.
    Figure 2. Strap inserted in table mounting track
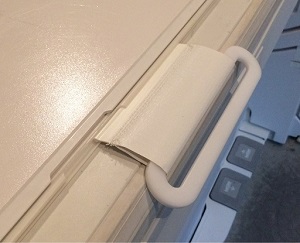
    • If you find it difficult to insert the strap into the track or move it in the track, then slightly bend the strap base on a hard surface.
      Figure 3. Bend the strap base
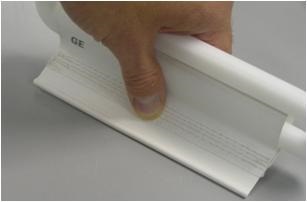
      Figure 4. Bent strap that more easily slides in the mounting track
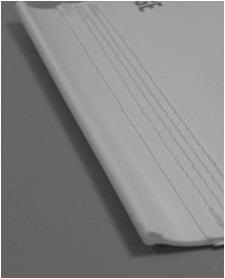
  6. Provide blankets, pillows, etc. for patient comfort.
  7. Add dielectric pads if required.
    • Dielectric pads abdomen procedure
    • Dielectric pads neck procedure
  8. If necessary, attach cardiac leads and the respiratory device.
  9. Remove any accessory devices from the bore of the magnet that are not required for the procedure.
  10. Keep electrically conductive material that must remain in the magnet bore from directly contacting the patient by placing insulation between the conductive material and the patient.
  11. Place a clean cotton sheet over the coil and comfort pad so the patient's skin does not come in contact with the coil or the comfort pad.
  12. Position RF cables down the center and directly out of the bore (i.e., not along side of the MR system or close to the body coil or other transmit RF coil), without looping or crossing the cables.
    • Route the cables so there are no loops (conductive loops can be circular, u-shaped, or s-shaped) in any cables in the magnet.
    • Use the appropriate gating cable for surface coil imaging.
    • Use only MR system recommended monitoring equipment, ECG leads, wires, electrodes, and other components and accessories.
    • Follow all instructions for the proper operation of physiologic monitoring or other equipment provided by the manufacturer of the device.
  13. Provide the patient with the patient alert bulb so that the patient may signal you if needed.
    • If your patient tells you he or she is experiencing a burning sensation, stop the scan.
  14. Explain breathing instructions, table movement, length of exam, gradient noise, adjustment of mirror on head coil, etc.
    • Instruct the patient not to clasp his or her hands or cross his or her feet in the magnet bore.
  15. Provide the patient with hearing protection.

    Closely monitor the patient (especially those who are unconscious) during the procedure. If the patient reports sensations of heating or other unusual sensation, discontinue the procedure immediately and perform a thorough assessment of the situation.