Display the desired localizer images in Graphic Rx.
Place the cursor over the image that represents the scan plane in the protocol and click to deposit the VOI.
For example, if the protocol is for an axial scan plane, deposit the VOI on an axial localizer image.
To make sure the Spectroscopy localizer launches in READY View , it is best to only change the VOI location and size on the image that has the CSI grid displayed. This is the image on which you deposit the VOI.
If you need to change the voxel thickness, change it from the Voxel Thickness text box and do not change the VOI depth on the Graphic Rx images.
If you deposited the VOI on an axial image, then do not change the VOI size on the coronal or the sagittal.
You can change the VOI size on the axial because this is not changing the depth of the VOI.
Do NOT change the Center Z value.
For Single Voxel and 2D CSI prescriptions, do not change the CSI Slice Thickness value. It does not mean anything. The Voxel Thickness value determines the depth of the VOI.
Click and drag the VOI over the area of interest on the plane where you deposited it.
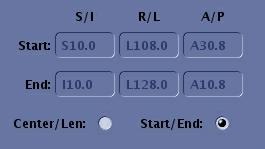
To view the single voxel explicit location, select Start/End.
Figure 1. Start/End radio button
The explicit fields cannot be edited.
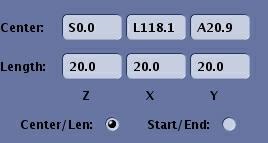
To explicitly define the center of the VOI and the length in all directions, select Center/Length and edit the text fields.